Wednesday, 10 August 2016

20th July 2016 - But what about the allotment?

Good question! The weeds have been growing away, so a brutal bit of gardening was required. We went from this....
....To this!


Now we can see what were are doing again! Over the school holidays we will be using the allotment more, as the farm will be busier with public visiting. Pleased to see some fruit coming on the trees that were pruned earlier in the year, something to look forwards to!


13th July 2016 - Happy pickings!


As the garden has been a little quieter this week, we had another visit from K, who was excited to see what was ready to be harvested. The broad beans were just starting to be ready for picking, so here are the first ones...

 The inside of the pods is  so amazing, the beans look like they are tucked in with a duvet. K took some home to be cooked.


Also above is a picture of one of the pond skaters from our pond. K loves to find mini-beasts, though we nearly got wetter than intended so she could get a closer look!
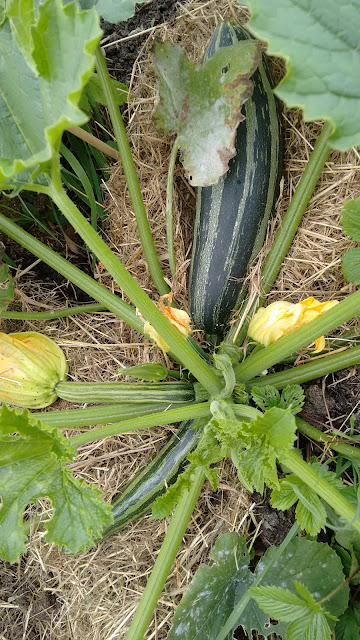
And we are very proud of our marrow! It's the first time we've grown one, but it seems super happy, and it looks like there are plenty more to come.

How to make a water butt!


A quick little post about water and recycling...

In our sensory garden, we do have a bit of an issue in that we are a long way from a source of water, and on the odd days that the weather is good, it is Really good, hot and dry - scorching in fact! So with all the new plants that we have been putting in, we need to get something sorted out.

We don't have funds to buy much for the garden, but we did have several large blue plastic drums which were donated, and so, I set about converting one into a water butt, to collect rain water. I thought I would share how I did it, as it wasn't that difficult, though you do have to be happy using power tools.


Step 1. Cut the top off the barrel using a wood saw. This takes a bit of time, but once you are going, it isn't too difficult


 Step 2. Purchase a replacement tap (about £2 ). Your will need to use a disc cutting drill bit (see photo) which is the same diameter as the tap, mark where you want the tap to be, I chose to put it about 6" up from the bottom of the butt, so that the collected water will weigh down the water butt and make it less likely to be tipped over. Drill the circular hole, and fit the tap.

Step 3. Making the lid. I didn't want to leave to top of the water butt open, for several reasons: The children using the garden may reach in / try to climb in, Rubbish and leaves may end up in there, we don't want wildlife in there!
So the end which got sawn off, was flipped upside down, and the 6 small holes were drilled. It will act as a funnel to collect the rain water and allow it to drain into the barrel.

Step 4 -  Securing the lid. I drilled four pairs of holes, in the lid, and the barrel itself, and using removable cable ties, I fixed the lid onto the barrel, so it can be take off if needed, but will not blow off or be dislodged by inquisitive hands. 

Ta-da! This is the finished water butt!

I have positioned the water butt on a tyre, to raise it high enough for a watering can to be filled underneath. Also I have built a compartment out of pallets to try to ensure that is it safe and will not be able to be pulled over.

So I hope that's helpful, I have another two to do, one for the allotment, and another for the sensory garden.

6th July 2016 - Coming together

 This week was our last visit from the Autism Specialist School for this year. It was good to be finishing on a sunny day. With the grass now tidy, we put back the painted tyres, as a dividing wall between the sections of the garden. The cable-reel table is now set up, though the stools need a little more work.


The final bed was filled up by the Barrowing team (who have been keen to stick with the task, despite the smells) which is the Touch bed. We planted some of the donated plants, which have interesting textures, velvety, spiky, rubbery, bumpy. Though it isn't ideal to be planting on such a hot day, this being Wales; it is likely to be raining soon enough!

 The edibles bed has been filled up with the rest of the donated plants, and seedlings which have been grown, Broad Beans, Strawberries, Runner beans, and Tomatoes.


Some of the children got creative and made these signs, to go in each of the sensory beds to let people know what they are about.


So we said Thank you and Farewell to the group for the summer. They have been so eager to get stuck in to the tasks and activities, and it has been great to get to know them over the last term. The difference in the garden now is amazing, and we couldn't have done it without their help.

29th June 2016 Thankyou Greenmoor Nurseries!

I was bowled over this week with the generosity of the local Garden Nursery - Greenmoor, which is on the opposite side of the road to Walnut Tree Farm in St Hilary.
The plants below were all donated for our sensory garden, there are some touchy-feely plants for our "Touch" bed - sedums, grasses, some herbs for the "Smell" bed - Rosemary, and mint, some eyecatching flowers for the "Sight" bed - geraniums, cosmos and Dahlia's, and some strawberries and runner beans for eating. K came over to the nursery with us to help us choose the plants and was very good at spotting a healthy plant.

Thankyou once again Greenmoor Nurseries x


Meanwhile... back on the Allotment...

22nd June 2016

A quick visit to the Allotment, to keep an eye on what was happening, and a very happy surprise, we had a small crop of raspberries, strawberries and red currants, our Peas, that  J helped to sow are looking brilliant, and our potatoes are doing well too. The fruit went back to the farm, where it didn't last long!


22nd June 2016 Mowing the Meadow

Finally, we cut the grass! And we discovered a garden underneath our natural meadow. While the mowing was an adults only job, the following day we had another visit from the Autism Specialist School, who brought the willing helpers that we needed. We had a super productive day, one team were raking up all of the cut grass, another team cut the thistles and long grass by the fence and around the raised beds.

The wheelbarrow team were back in force and filled up the 3rd raised bed, which this year is going to be another "Edible" bed, as we will need to collect up plants for a Smell bed next year. We had 2 Pumpkin plants waiting, so they went straight in to get growing.


The children who enjoy the more creative tasks did some stamping and sponge painting to finish off their decorated pots

 And lastly in the sensory garden, the bird table had a makeover, with a quick coat of paint.